Stress-X
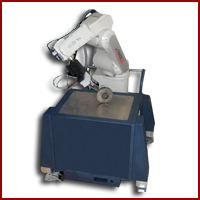
Stress-X allows to measure residual stress, providing a through non-destructive analysis of samples of any dimensions thanks to the original mounting of the diffractometer head on a 6 anthropomorphic axis robot.
The robot and the related measuring head are mounted on a robust trolley made of steel which holds all the control electronics, water cooler for X-ray tube cooling and personal computer.
Robot allows an accuracy in positioning and repeatability of 20 microns.
It is possible to measure specimens positioned on the measuring platform on board or any other specimen positioned outside of the instrument basement at optimal measurement distance of 700 mm from the robot centre.
Measurement target is defined by a combination of a Video camera for X-Y pointing and a laser for Z positioning.
Laser accuracy is less of 10 microns with a measuring range of 300+/-70 mm.
Thanks to the 6 degree of freedom the measurement positions and angular ranges are practically unlimited.


 HPLC System
  HPLC System
  Circular Dichroism Spectrometer
 P-2000 multi-option polarimeter for your laboratory needs.
 Spectrophotometers
  FT-IR instruments and sampling accessories
 Raman Systems Most Versatile System
 MULTI-PURPOSE AND HIGH RESOLUTION THETA/THETA X-RAY DIFFRACTOMETER
